You can make files private directly in Windows Explorer. For example, if you share a computer you can make your files private so that no other user can open these files without your passphrase.
To make files private in Windows Explorer:
1. Open Windows Explorer.
2. Select the files you want to make private.
3. You can either:
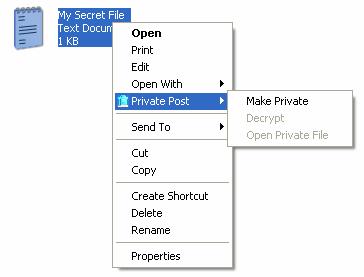
· Right mouse click and select Make Private from the Private Post sub menu, or
· Select Make Private from the Private Post sub menu from the Windows Explorer File menu, or,
· Copy the files to the Clipboard and select Make Private from the Private Post Tools menu (see Making the Contents of the Clipboard Private).
Figure 46 - Private Post sub menu in Windows Explorer
The Private Post Wizard Select a Destination window is displayed.
4. Select the folder that the private files are to be saved in using the Browse button.
Note: If you select a folder that doesn’t exist Private Post prompts you to create the new folder.

Figure 47 - Private Post Wizard Select a Destination window
5. Click the Next button.
The Private Post Wizard Select Encryption Keys window is displayed.
6. Enter your email address in the field labelled The data will be encrypted to this Identity and click on the Add button.
Note: If you have previously used the Private Post Wizard your email address is stored in the identities box and you need to ensure that the correct identity is ticked.
7. Click on the Next button.
The Private Post Wizard Complete window is displayed.

Figure 48 - Private Post Wizard Complete window
8. Click the Finish button.
A new folder window is displayed showing the private files in the selected folder.
Note: If you chose not to have the Show encrypted files check box selected, this window is not displayed.